Différences entre les versions de « Utilisateur:Jupotter/Sandbox »
| (21 versions intermédiaires par le même utilisateur non affichées) | |||
| Ligne 1 : | Ligne 1 : | ||
Sandbox de Jupotter, utilisé pour faire des traductions | Sandbox de Jupotter, utilisé pour faire des traductions | ||
[[Category:Tutorials]] | |||
[[Category:New Users]] | |||
{{Tutorial Index | {{Tutorial Index | ||
|series=Quest Design Fundamentals | |series=Quest Design Fundamentals | ||
|chapter= | |chapter=4 | ||
|Prev= | |Prev=Bethesda_Tutorial_Dialogue | ||
|Next= | |Next=Bethesda_Tutorial_Basic_Quest_Scripting | ||
}} | }} | ||
=Résumé= | |||
Ce tutoriel va vous permettre de créer l'amulette qui fut volée a Bendu Olo dans notre quête. | |||
<br><br>Vous apprendrez: | |||
* | * Comment créer un nouvel objet. | ||
* ''' | * Comment l'ajouter a l'inventaire d'un acteur. | ||
=Créer/Copier un Objet= | |||
Lorsque vous modderez, vous copierez la plupart du temps un objet déjà existant et changerez ses valeurs. De cette manière, vous aurez déjà le modèle 3D près, et vous vous baserez sur quelque chose que vous savez qu'il marche, vous n'aurez alors pas a régler toute les options. | |||
::{|style="border-collapse: separate; border-spacing: 0; border-width: 1px; border-style: solid; border-color: #000; padding: 0" | ::{|style="border-collapse: separate; border-spacing: 0; border-width: 1px; border-style: solid; border-color: #000; padding: 0" | ||
|- | |- | ||
|style="border-style: solid; border-width: 0"|[[Image: | |style="border-style: solid; border-width: 0"|[[Image:CKInDepth.jpg|48px]] | ||
|style="border-style: solid; border-width: 0"| | |style="border-style: solid; border-width: 0"|Même ici, nous copions souvent un objet existant pour pouvoir travailler avnt d'avoir les graphismes. Beaucoup d'objets du jeu on commencé en ressemblant a des sceau. | ||
|} | |} | ||
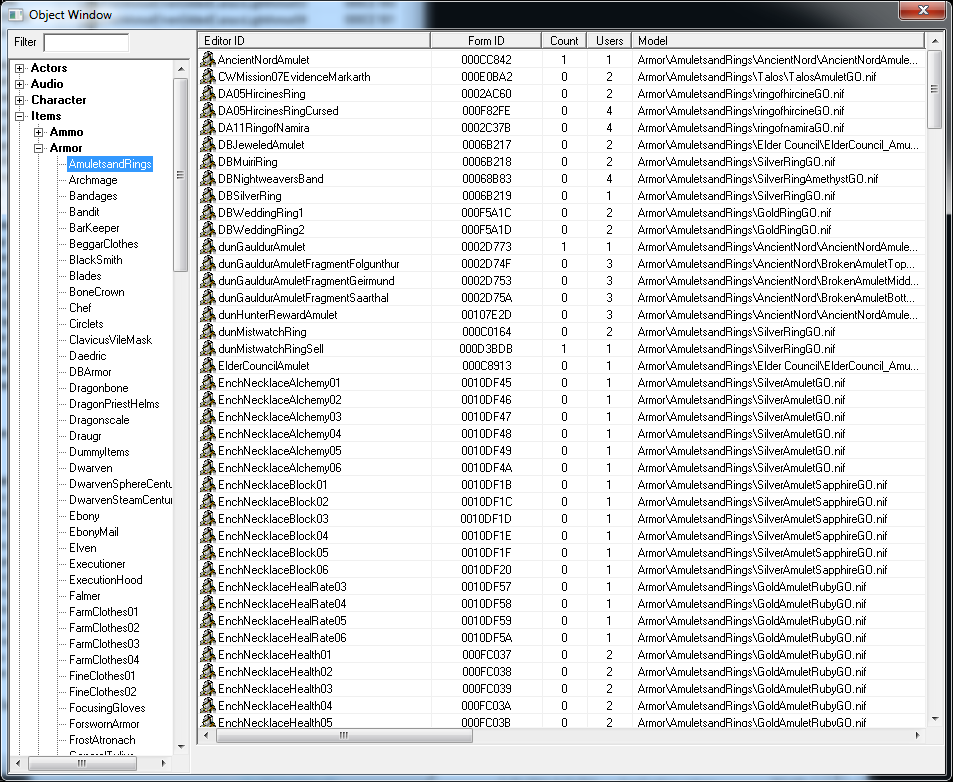
Pour cette amulette, nous allons faire une copie de l'Amulette du Conseil des Anciens qui est utilisée dans la quête de la Confrérie Noire. Dans la fenêtre d'objets, naviguez vers <code>Items -> Armor -> AmuletsandRings</code>. | |||
[[Image:CKObjectWindowAmuletsAndRings.png|600px]] | |||
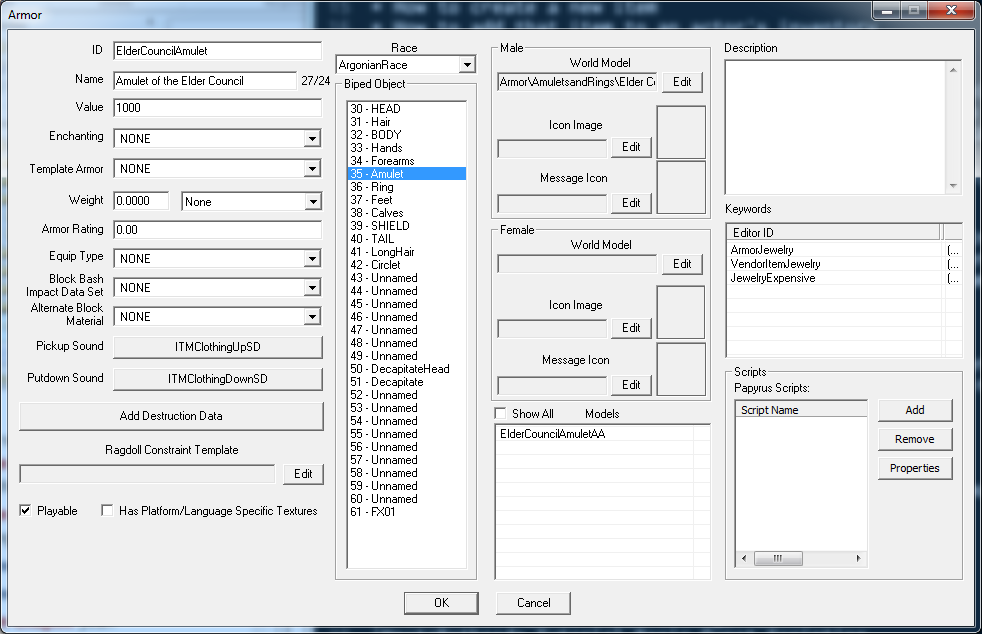
Double cliquez sur "ElderConcilAmulet" pour ouvrir la fenêtre des armures. | |||
[[Image:CKElderCouncilAmulet.png|600px]] | |||
Nous allons y faire quelque changement pour faire quelque chose d'approprié pour notre quête. | |||
* '''ID:''' Changez le en "GSQAmulet" | |||
* '''Name:''' Mettez "Amulette de Bendu Olo" | |||
* '''Valeur:''' Changez pour 250 (Bendu n'est pas très riche) | |||
Laissez le reste exactement tel qu'il est, et appuyez sur OK. Comme nous avons changé l'ID, on va nous demander si nous voulons créer un nouvel objet avec ces attributs, ou change celui existant. Nous voulons faire un nouvel objet, alors appuyez sur "Yes". | |||
[[ | [[Image:CKNewForm.png]] | ||
C'est tout ce qu'il faut! Dans ce cas, nous avons fait un morceau d'armure, mais la même méthode peut être utilisé pour tout objet du jeu qui a un ID, Vous pouvez faire de nouvelles armes, races, créatures, sorts, ingrédients, etc. en changeant l'ID. | |||
La dernière chose a faire est de la mettre dans l'inventaire de notre voleur. Ouvrez l'acteur GSQThief a nouveau, et naviguez a l'onglet inventaire de la fenêtre d'acteur. | |||
[[Image:CKThiefInventoryBlocked.png|600px]] | |||
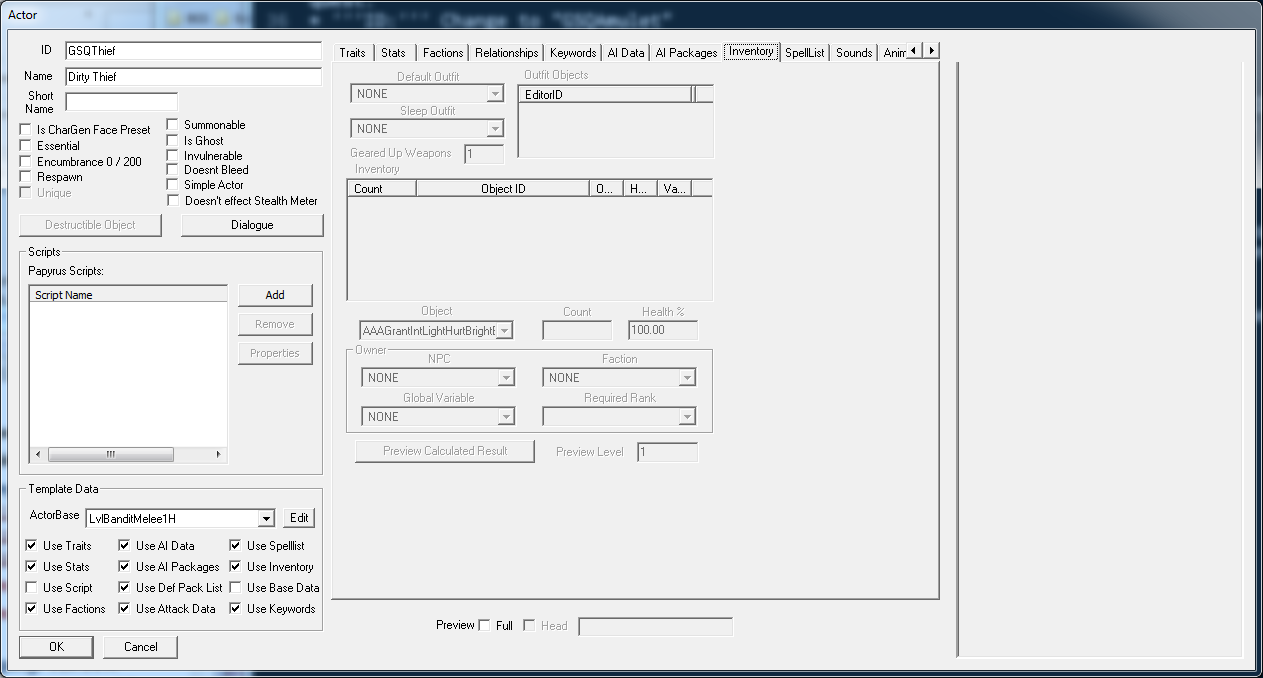
La première chose que vous remarquerez est que il est entièrement grisé. C'est parce que nous utilisons un template pour cet acteur, et donc l'inventaire est pris de ce template. Mais nous pouvons passer outre certaines parties de ce template facilement. Décochez la case "Use Inventory" en bas a gauche de la fenêtre, et la zone de l'inventaire devrais s'activer. | |||
Nous allons devoir utiliser une tenue pour notre bandit, puisque nous n'utilisons plus le template. Sélectionnez "BanditArmorMeleeHeavyOutfit" dans le menu "Default Outfit". | |||
Pour ajouter des objets en plus dans l'inventaire de notre acteur, faites un clic droit dans le tableau de l'inventaire et sélectionnez "New". Cela ajoute une nouvelle entrée dans le tableau qui par défaut est 1 instance du premier objet du jeu. Dans le menu déroulant Object, sélectionnez l'objet que nous venos de créer (GSQAmulet), et l'inventaire du voleur est près! | |||
The first thing you'll notice is that it's all grayed out. That's because we're basing this actor off of a template, and so the inventory is already set by that template. But we can override individual parts of a template easily. Uncheck the "Use Inventory" box in the bottom left corner of the window, and the inventory area should light up. | |||
We'll have to fill in an outfit for our bandit, since the default template one is now gone. Select "BanditArmorMeleeHeavyOutfit" from the Default Outfit pulldown menu. | |||
To put additional items into the actor's inventory, right-click in the Inventory table and select "New." This adds an entry to the table that defaults to 1 instance of the first object (alphabetically) in the game. From the Object pulldown menu, choose the item we just created (GSQAmulet), and the thief's inventory is ready to go! | |||
[[ | [[Image:CKInventoryFilled.png|600px]] | ||
{{Template:Tutorial_Bottom_Bar | {{Template:Tutorial_Bottom_Bar | ||
|Prev= | |Prev=Bethesda_Tutorial_Dialogue | ||
|Next= | |Next=Bethesda_Tutorial_Basic_Quest_Scripting | ||
}} | }} | ||
Version actuelle datée du 12 février 2012 à 12:13
Sandbox de Jupotter, utilisé pour faire des traductions Modèle:Tutorial Index
Résumé
Ce tutoriel va vous permettre de créer l'amulette qui fut volée a Bendu Olo dans notre quête.
Vous apprendrez:
- Comment créer un nouvel objet.
- Comment l'ajouter a l'inventaire d'un acteur.
Créer/Copier un Objet
Lorsque vous modderez, vous copierez la plupart du temps un objet déjà existant et changerez ses valeurs. De cette manière, vous aurez déjà le modèle 3D près, et vous vous baserez sur quelque chose que vous savez qu'il marche, vous n'aurez alors pas a régler toute les options.
Pour cette amulette, nous allons faire une copie de l'Amulette du Conseil des Anciens qui est utilisée dans la quête de la Confrérie Noire. Dans la fenêtre d'objets, naviguez vers Items -> Armor -> AmuletsandRings.
Double cliquez sur "ElderConcilAmulet" pour ouvrir la fenêtre des armures.
Nous allons y faire quelque changement pour faire quelque chose d'approprié pour notre quête.
- ID: Changez le en "GSQAmulet"
- Name: Mettez "Amulette de Bendu Olo"
- Valeur: Changez pour 250 (Bendu n'est pas très riche)
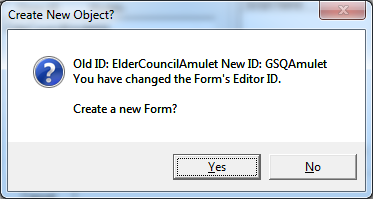
Laissez le reste exactement tel qu'il est, et appuyez sur OK. Comme nous avons changé l'ID, on va nous demander si nous voulons créer un nouvel objet avec ces attributs, ou change celui existant. Nous voulons faire un nouvel objet, alors appuyez sur "Yes".
C'est tout ce qu'il faut! Dans ce cas, nous avons fait un morceau d'armure, mais la même méthode peut être utilisé pour tout objet du jeu qui a un ID, Vous pouvez faire de nouvelles armes, races, créatures, sorts, ingrédients, etc. en changeant l'ID.
La dernière chose a faire est de la mettre dans l'inventaire de notre voleur. Ouvrez l'acteur GSQThief a nouveau, et naviguez a l'onglet inventaire de la fenêtre d'acteur.
La première chose que vous remarquerez est que il est entièrement grisé. C'est parce que nous utilisons un template pour cet acteur, et donc l'inventaire est pris de ce template. Mais nous pouvons passer outre certaines parties de ce template facilement. Décochez la case "Use Inventory" en bas a gauche de la fenêtre, et la zone de l'inventaire devrais s'activer.
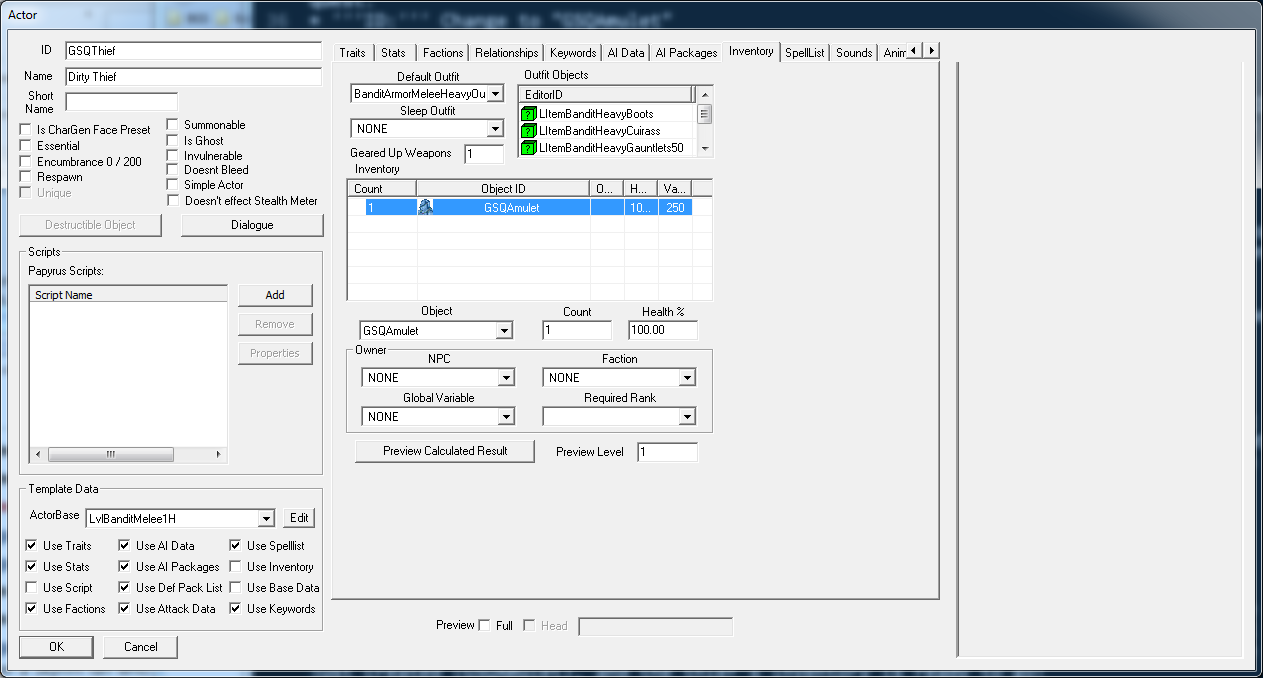
Nous allons devoir utiliser une tenue pour notre bandit, puisque nous n'utilisons plus le template. Sélectionnez "BanditArmorMeleeHeavyOutfit" dans le menu "Default Outfit".
Pour ajouter des objets en plus dans l'inventaire de notre acteur, faites un clic droit dans le tableau de l'inventaire et sélectionnez "New". Cela ajoute une nouvelle entrée dans le tableau qui par défaut est 1 instance du premier objet du jeu. Dans le menu déroulant Object, sélectionnez l'objet que nous venos de créer (GSQAmulet), et l'inventaire du voleur est près!
The first thing you'll notice is that it's all grayed out. That's because we're basing this actor off of a template, and so the inventory is already set by that template. But we can override individual parts of a template easily. Uncheck the "Use Inventory" box in the bottom left corner of the window, and the inventory area should light up.
We'll have to fill in an outfit for our bandit, since the default template one is now gone. Select "BanditArmorMeleeHeavyOutfit" from the Default Outfit pulldown menu.
To put additional items into the actor's inventory, right-click in the Inventory table and select "New." This adds an entry to the table that defaults to 1 instance of the first object (alphabetically) in the game. From the Object pulldown menu, choose the item we just created (GSQAmulet), and the thief's inventory is ready to go!
