|
|
| (13 versions intermédiaires par le même utilisateur non affichées) |
| Ligne 5 : |
Ligne 5 : |
| {{Tutorial Index | | {{Tutorial Index |
| |series=Quest Design Fundamentals | | |series=Quest Design Fundamentals |
| |chapter=2 | | |chapter=4 |
| |Prev=Bethesda_Tutorial_Planning_the_Quest | | |Prev=Bethesda_Tutorial_Dialogue |
| |Next=Bethesda_Tutorial_Dialogue | | |Next=Bethesda_Tutorial_Basic_Quest_Scripting |
| }} | | }} |
|
| |
|
| =Résumé= | | =Résumé= |
| Ce chapitre vas vous montrer comment faire des NPC dans l'éditeur, a la fois civils (pas fait | | Ce tutoriel va vous permettre de créer l'amulette qui fut volée a Bendu Olo dans notre quête. |
| | <br><br>Vous apprendrez: |
| | * Comment créer un nouvel objet. |
| | * Comment l'ajouter a l'inventaire d'un acteur. |
|
| |
|
| =Overview= | | =Créer/Copier un Objet= |
| This chapter will show you how to make NPCs in the editor, both civilians (not meant to provide a combat challenge to the player) and enemies.
| | Lorsque vous modderez, vous copierez la plupart du temps un objet déjà existant et changerez ses valeurs. De cette manière, vous aurez déjà le modèle 3D près, et vous vous baserez sur quelque chose que vous savez qu'il marche, vous n'aurez alors pas a régler toute les options. |
| <br><br>The reader will learn:
| |
| *How NPCs are created in the editor
| |
| *How to set up basic combat stats on an NPC
| |
| | |
| =Actors=
| |
| In Skyrim, all moving creatures are set up as a special kind of object called an Actor. All animals and humanoids use this object, and it's where appearance, behaviors, and everything else about a character is defined.
| |
|
| |
|
| ::{|style="border-collapse: separate; border-spacing: 0; border-width: 1px; border-style: solid; border-color: #000; padding: 0" | | ::{|style="border-collapse: separate; border-spacing: 0; border-width: 1px; border-style: solid; border-color: #000; padding: 0" |
| |- | | |- |
| |style="border-style: solid; border-width: 0"|[[Image:NewFeature.jpg|48px]] | | |style="border-style: solid; border-width: 0"|[[Image:CKInDepth.jpg|48px]] |
| |style="border-style: solid; border-width: 0"|If you're familiar with Fallout 3 and earlier engines, Creatures and NPCs have been combined into Actors, which gives you a lot more flexibility in creating their behaviors. | | |style="border-style: solid; border-width: 0"|Même ici, nous copions souvent un objet existant pour pouvoir travailler avnt d'avoir les graphismes. Beaucoup d'objets du jeu on commencé en ressemblant a des sceau. |
| |} | | |} |
|
| |
|
| In the [[Bethesda_Tutorial_Creation_Kit_Interface#Object_Window|Object Window]], navigate to Actors -> Actor in the category list. Right-click anywhere in list of actors and select "New."
| | Pour cette amulette, nous allons faire une copie de l'Amulette du Conseil des Anciens qui est utilisée dans la quête de la Confrérie Noire. Dans la fenêtre d'objets, naviguez vers <code>Items -> Armor -> AmuletsandRings</code>. |
| | |
| =Creating Bendu Olo=
| |
| Thankfully, a lot of the fields in the [[:Category:Actor|Actor window]] are pretty self-explanatory. That said, there's a decent amount of setup that you need to do to make someone. So here we go.
| |
| | |
| [[image:EmptyActor.png|700px|]]
| |
| | |
| | |
| * '''ID:''' Just like with the quest ID, this needs to be unique across the game. Give him the ID GSQBenduOlo. (Note that IDs can't have spaces or special characters in them.)
| |
| * '''Name:''' The name that will be visible to the player. "Bendu Olo" in our case.
| |
| * '''Short Name:''' How somebody familiar with this character might refer to them. This gets used by the radiant story system, which we'll come back to later. For now, just call him "Bendu."
| |
| * '''Unique:''' This is the only checkbox you need to worry about for now. It lets the engine know that there should only be one of this actor in the world (as opposed to a new type of animal we were making, for instance). Make sure this is checked.
| |
| | |
| There are a few things we need to set up in the [[Traits_Tab_-_NPC|Traits tab]], just to the right.
| |
| | |
| * '''Race:''' Pretty self-explanatory -- sets the race that this actor will be. Select "DarkElfRace" from the pull-down menu. Now Bendu will have the appearance and racial bonuses of a Dark Elf.
| |
| * '''Voice Type:''' This determines what generic dialogue and combat barks this actor will have available to them. Set him up as a MaleDarkElf.
| |
| | |
| [[Image:StartedActor.png|600px]]
| |
| | |
| ::{|style="border-collapse: separate; border-spacing: 0; border-width: 1px; border-style: solid; border-color: #000; padding: 0"
| |
| |-
| |
| |style="border-style: solid; border-width: 0"|[[Image:InDepth.jpg|48px]]
| |
| |style="border-style: solid; border-width: 0"|In most cases, characters are not prefixed with an identifier because they are often used by multiple quests. Since Bendu might have a bright future ahead of him, we might consider just calling him "BenduOlo."
| |
| |}
| |
| | |
| Finally, hop over to the [[Inventory_Tab|Inventory tab]]. Here we'll give him some clothes so he's not just running around in his underwear.
| |
| | |
| What an actor chooses to wear is determined by their [[Outfit]]. Skyrim ships with a number of snazzy outfits already defined, but you can make your own fairly easily if you want to. For now, give him some plain clothes with a hat by choosing "FarmClothesOutfit01WithHat" from the Default Outfit pulldown menu.
| |
| | |
| [[Image:ActorInventory.png|400px]]
| |
| | |
| =Placing the Actor=
| |
| What we've done here is create the base object for the actor; to actually place him in the game, we'll need to create a reference for him. (If you're unfamiliar with the difference between a base object and a reference, see the callout box on [[Bethesda_Tutorial_Creation_Kit_Interface|this page]] labeled "Base Object vs Reference.")
| |
| | |
| We're going to place Bendu into an existing space. In Mixwater Mill, there's a house that used to have workers there, but has since been abandoned. Let's make it Bendu's home.
| |
| | |
| Look at the [[Cell View Window|Cell View window]]. Make sure that the pulldown menu to the right of "World Space" says "Interiors," then select "MixwaterMillWorkersHouse" from the cell list. Double click to load it up.
| |
|
| |
|
| [[Image:CellViewSelected.png|600px]] | | [[Image:CKObjectWindowAmuletsAndRings.png|600px]] |
|
| |
|
| Zoom out a little bit so you can see more of the interior space. (If you need help navigating around the render window, you can review [[Bethesda_Tutorial_Creation_Kit_Interface#Navigating_the_Render_Window|the earlier tutorial]] on it.)
| | Double cliquez sur "ElderConcilAmulet" pour ouvrir la fenêtre des armures. |
|
| |
|
| [[Image:MixwaterInterior.png|500px]] | | [[Image:CKElderCouncilAmulet.png|600px]] |
|
| |
|
| Adding our good Mr. Olo to the cell is as simple as grabbing GSQBenduOlo in the object window and dragging it to a place in the render window.
| | Nous allons y faire quelque changement pour faire quelque chose d'approprié pour notre quête. |
| | * '''ID:''' Changez le en "GSQAmulet" |
| | * '''Name:''' Mettez "Amulette de Bendu Olo" |
| | * '''Valeur:''' Changez pour 250 (Bendu n'est pas très riche) |
|
| |
|
| [[Image:MixwaterInteriorPlusBendu.png|500px]]
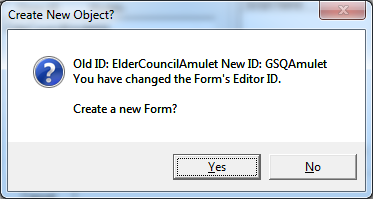
| | Laissez le reste exactement tel qu'il est, et appuyez sur OK. Comme nous avons changé l'ID, on va nous demander si nous voulons créer un nouvel objet avec ces attributs, ou change celui existant. Nous voulons faire un nouvel objet, alors appuyez sur "Yes". |
|
| |
|
| =Testing the Actor In-Game=
| | [[Image:CKNewForm.png]] |
| If you're eager to meet your new creation, that's easy enough. Just make sure [[:Category:Getting_Started#Loading_Your_Plugin_in_the_Game|your plugin is loaded]], and start the game. Once you do, start the game, pull up the console, and:
| |
|
| |
|
| <pre>
| | C'est tout ce qu'il faut! Dans ce cas, nous avons fait un morceau d'armure, mais la même méthode peut être utilisé pour tout objet du jeu qui a un ID, Vous pouvez faire de nouvelles armes, races, créatures, sorts, ingrédients, etc. en changeant l'ID. |
| COC MixwaterMillWorkersHouse
| |
| </pre>
| |
|
| |
|
| Inside, you should find Bendu wandering around, maybe sitting in a chair. He won't have much to say to you, since we haven't written any dialogue for him, and won't have much to do, since we haven't given him any activities. But you have now created a new NPC, so congrats.
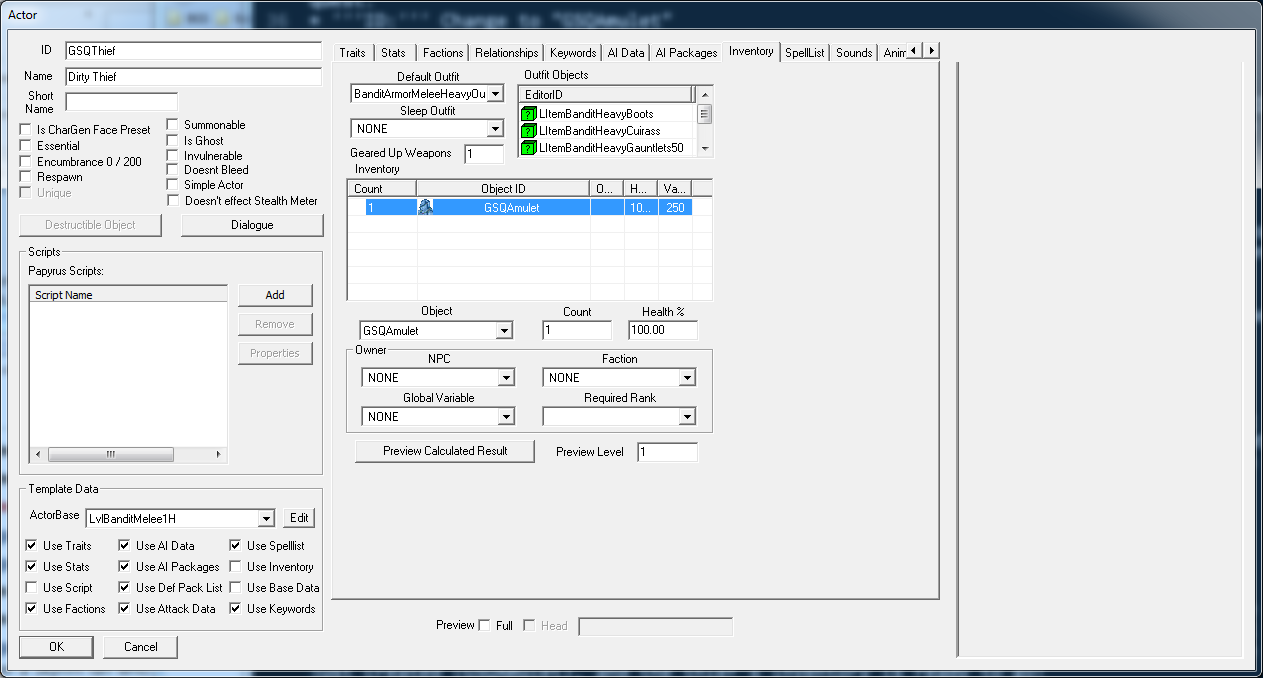
| | La dernière chose a faire est de la mettre dans l'inventaire de notre voleur. Ouvrez l'acteur GSQThief a nouveau, et naviguez a l'onglet inventaire de la fenêtre d'acteur. |
|
| |
|
| [[Image:BenduInGame.png|500px]] | | [[Image:CKThiefInventoryBlocked.png|600px]] |
|
| |
|
| =Making an Enemy=
| | La première chose que vous remarquerez est que il est entièrement grisé. C'est parce que nous utilisons un template pour cet acteur, et donc l'inventaire est pris de ce template. Mais nous pouvons passer outre certaines parties de ce template facilement. Décochez la case "Use Inventory" en bas a gauche de la fenêtre, et la zone de l'inventaire devrais s'activer. |
| Now we're going to make the thief who stole Bendu's amulet. Create a new actor like you did before, and give it the ID "GSQThief" and the name "Dirty Thief."
| |
|
| |
|
| Now things get a little more interesting, though. Instead of specifying the rest of the thieve's data, we're going to use a template. In the bottom left of the Actor window, you can see a "Template Data" section.
| | Nous allons devoir utiliser une tenue pour notre bandit, puisque nous n'utilisons plus le template. Sélectionnez "BanditArmorMeleeHeavyOutfit" dans le menu "Default Outfit". |
|
| |
|
| [[Image:ActorWindowTemplateArea.png|600px]]
| | Pour ajouter des objets en plus dans l'inventaire de notre acteur, faites un clic droit dans le tableau de l'inventaire et sélectionnez "New". Cela ajoute une nouvelle entrée dans le tableau qui par défaut est 1 instance du premier objet du jeu. Dans le menu déroulant Object, sélectionnez l'objet que nous venos de créer (GSQAmulet), et l'inventaire du voleur est près! |
|
| |
|
| Using a template lets us base this actor off another one. It's great for any kind of actor you plan to be a combatant, because you can easily use existing leveled lists and stats, just changing the bits that you want.
| | The first thing you'll notice is that it's all grayed out. That's because we're basing this actor off of a template, and so the inventory is already set by that template. But we can override individual parts of a template easily. Uncheck the "Use Inventory" box in the bottom left corner of the window, and the inventory area should light up. |
| | |
| So from the ActorBase pulldown list, choose "LvlBanditMelee1H." That name is kind of a mouthful, but is easily broken down:
| |
| * '''Lvl:''' This actor uses a leveled list, so as the player becomes more powerful, this actor will increase in difficulty accordingly. (Leveled lists are too complicated to get into here; if you're interested, their [[:Category:Leveled_Lists|details are documented]].)
| |
| * '''Bandit:''' This actor's appearance and gear fit the archetype we generally think of for bandit characters in the world, and will show up as "Bandit" in the player's combat interface.
| |
| * '''Melee:''' This actor will use melee attacks as opposed to ranged or magic attacks.
| |
| * '''1H:''' This actor will use a one-handed weapon.
| |
| | |
| Within that, there's a lot of variation and randomness. You might get a female Khajiit one time, a male Nord another. Using leveled templates let us provide suitable challenges to the player regardless of their progress, as well as a bit of variety.
| |
| | |
| ::{|style="border-collapse: separate; border-spacing: 0; border-width: 1px; border-style: solid; border-color: #000; padding: 0"
| |
| |-
| |
| |style="border-style: solid; border-width: 0"|[[Image:achtung.png]]
| |
| |style="border-style: solid; border-width: 0"|Note that most leveled templates can resolve to a multitude of voice types, so you need to be careful when writing dialogue for templated actors. In our case, this actor is just a quest obstacle, so we don't care.
| |
| |}
| |
| | |
| Having chosen a template, we need to select which aspects of that template we want to use, by checking the appropriate boxes in the template area. Check every box except for "Use Script" and "Use Base Data."
| |
| | |
| [[Image:TemplatedActorFilled.png|300px]]
| |
| | |
| We don't have to worry about setting race, inventory, equipment, or anything else, since we're pulling all that from the template!
| |
| | |
| Click "OK" to save the thief actor.
| |
| | |
| =Placing the Enemy=
| |
| There aren't many unoccupied "dungeon" spaces in Skyrim, but one is available far out in the Reach. Load the cell "ReachwindEyrie01" and place a reference to the thief object the same way we we placed Bendu into the Mixwater Mill cell.
| |
| | |
| [[Image:TemplatedActorPlaced.png|500px]]
| |
| | |
| ::{|style="border-collapse: separate; border-spacing: 0; border-width: 1px; border-style: solid; border-color: #000; padding: 0"
| |
| |-
| |
| |style="border-style: solid; border-width: 0"|[[Image:InDepth.jpg|48px]]
| |
| |style="border-style: solid; border-width: 0"|You'll notice that the reference appears in the editor as a green ''M''. Because this actor is templated, the editor doesn't know what it looks like, so it draws a capital ''M'' for historical reasons since lost to the vortex of time (theories range from "ninja monkey" to "monster" to "marker"). It's green because the default difficulty for leveled actors is "Easy."
| |
| |}
| |
|
| |
|
| If you want to visit the new baddie you've created, start up the game with your plugin and:
| | We'll have to fill in an outfit for our bandit, since the default template one is now gone. Select "BanditArmorMeleeHeavyOutfit" from the Default Outfit pulldown menu. |
|
| |
|
| <pre>
| | To put additional items into the actor's inventory, right-click in the Inventory table and select "New." This adds an entry to the table that defaults to 1 instance of the first object (alphabetically) in the game. From the Object pulldown menu, choose the item we just created (GSQAmulet), and the thief's inventory is ready to go! |
| COC ReachwindEyrie01
| |
| </pre>
| |
|
| |
|
| Be ready for a fight!
| | [[Image:CKInventoryFilled.png|600px]] |
|
| |
|
| [[Image:DirtyThiefInGame.png|500px]]
| |
|
| |
|
| {{Template:Tutorial_Bottom_Bar | | {{Template:Tutorial_Bottom_Bar |
| |Prev=Bethesda_Tutorial_Planning_the_Quest | | |Prev=Bethesda_Tutorial_Dialogue |
| |Next=Bethesda_Tutorial_Dialogue | | |Next=Bethesda_Tutorial_Basic_Quest_Scripting |
| }} | | }} |
Sandbox de Jupotter, utilisé pour faire des traductions
Modèle:Tutorial Index
Résumé
Ce tutoriel va vous permettre de créer l'amulette qui fut volée a Bendu Olo dans notre quête.
Vous apprendrez:
- Comment créer un nouvel objet.
- Comment l'ajouter a l'inventaire d'un acteur.
Créer/Copier un Objet
Lorsque vous modderez, vous copierez la plupart du temps un objet déjà existant et changerez ses valeurs. De cette manière, vous aurez déjà le modèle 3D près, et vous vous baserez sur quelque chose que vous savez qu'il marche, vous n'aurez alors pas a régler toute les options.

|
Même ici, nous copions souvent un objet existant pour pouvoir travailler avnt d'avoir les graphismes. Beaucoup d'objets du jeu on commencé en ressemblant a des sceau.
|
Pour cette amulette, nous allons faire une copie de l'Amulette du Conseil des Anciens qui est utilisée dans la quête de la Confrérie Noire. Dans la fenêtre d'objets, naviguez vers Items -> Armor -> AmuletsandRings.
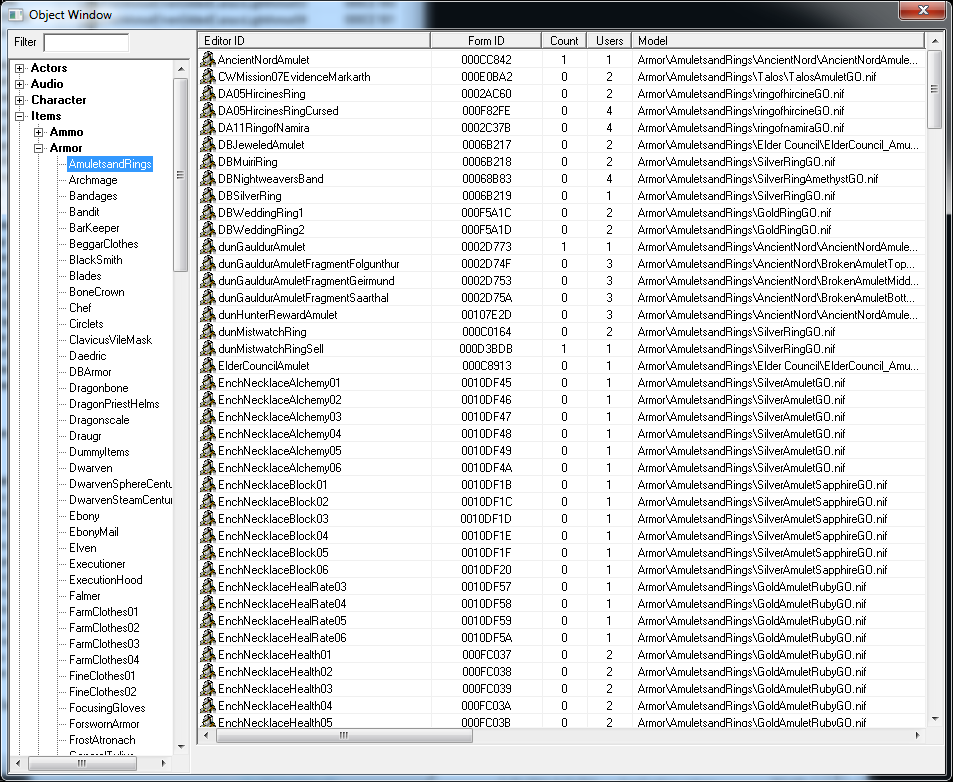
Double cliquez sur "ElderConcilAmulet" pour ouvrir la fenêtre des armures.
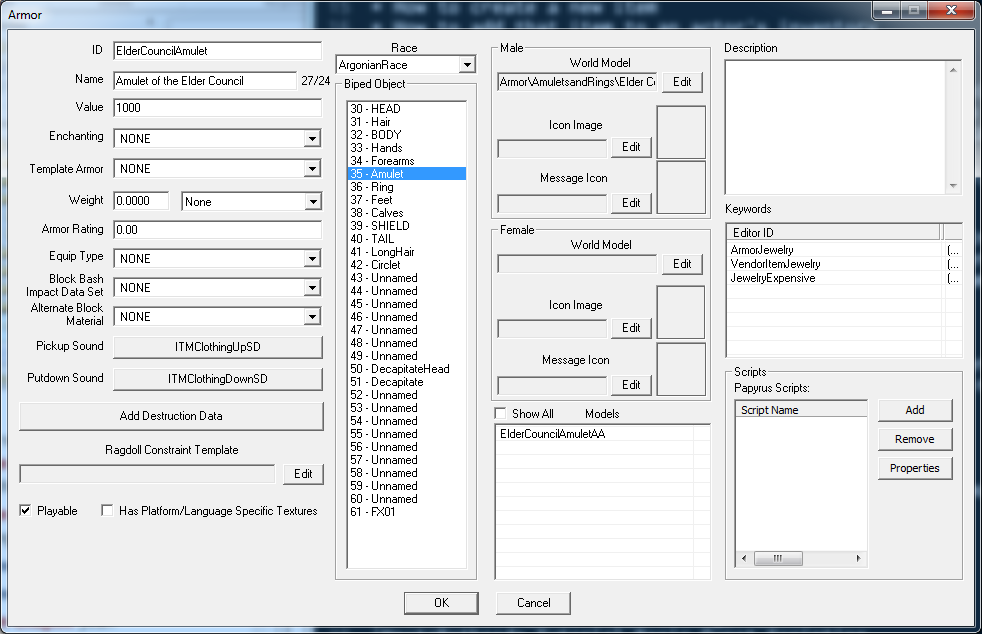
Nous allons y faire quelque changement pour faire quelque chose d'approprié pour notre quête.
- ID: Changez le en "GSQAmulet"
- Name: Mettez "Amulette de Bendu Olo"
- Valeur: Changez pour 250 (Bendu n'est pas très riche)
Laissez le reste exactement tel qu'il est, et appuyez sur OK. Comme nous avons changé l'ID, on va nous demander si nous voulons créer un nouvel objet avec ces attributs, ou change celui existant. Nous voulons faire un nouvel objet, alors appuyez sur "Yes".
C'est tout ce qu'il faut! Dans ce cas, nous avons fait un morceau d'armure, mais la même méthode peut être utilisé pour tout objet du jeu qui a un ID, Vous pouvez faire de nouvelles armes, races, créatures, sorts, ingrédients, etc. en changeant l'ID.
La dernière chose a faire est de la mettre dans l'inventaire de notre voleur. Ouvrez l'acteur GSQThief a nouveau, et naviguez a l'onglet inventaire de la fenêtre d'acteur.
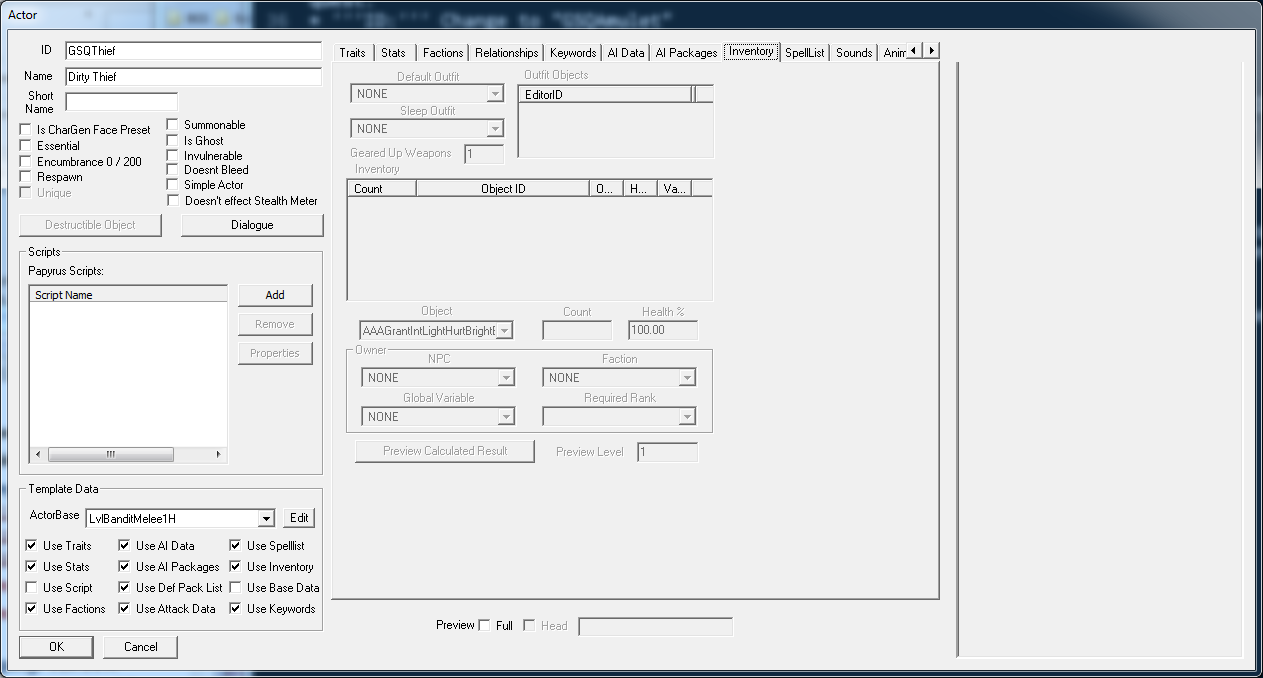
La première chose que vous remarquerez est que il est entièrement grisé. C'est parce que nous utilisons un template pour cet acteur, et donc l'inventaire est pris de ce template. Mais nous pouvons passer outre certaines parties de ce template facilement. Décochez la case "Use Inventory" en bas a gauche de la fenêtre, et la zone de l'inventaire devrais s'activer.
Nous allons devoir utiliser une tenue pour notre bandit, puisque nous n'utilisons plus le template. Sélectionnez "BanditArmorMeleeHeavyOutfit" dans le menu "Default Outfit".
Pour ajouter des objets en plus dans l'inventaire de notre acteur, faites un clic droit dans le tableau de l'inventaire et sélectionnez "New". Cela ajoute une nouvelle entrée dans le tableau qui par défaut est 1 instance du premier objet du jeu. Dans le menu déroulant Object, sélectionnez l'objet que nous venos de créer (GSQAmulet), et l'inventaire du voleur est près!
The first thing you'll notice is that it's all grayed out. That's because we're basing this actor off of a template, and so the inventory is already set by that template. But we can override individual parts of a template easily. Uncheck the "Use Inventory" box in the bottom left corner of the window, and the inventory area should light up.
We'll have to fill in an outfit for our bandit, since the default template one is now gone. Select "BanditArmorMeleeHeavyOutfit" from the Default Outfit pulldown menu.
To put additional items into the actor's inventory, right-click in the Inventory table and select "New." This adds an entry to the table that defaults to 1 instance of the first object (alphabetically) in the game. From the Object pulldown menu, choose the item we just created (GSQAmulet), and the thief's inventory is ready to go!
Modèle:Tutorial Bottom Bar


