|
|
| (5 versions intermédiaires par le même utilisateur non affichées) |
| Ligne 1 : |
Ligne 1 : |
| Sandbox de Jupotter, utilisé pour faire des traductions | | Sandbox de Jupotter, utilisé pour faire des traductions |
| | |
| | [[Category:Tutorials]] |
| | [[Category:New Users]] |
| | {{Tutorial Index |
| | |series=Quest Design Fundamentals |
| | |chapter=4 |
| | |Prev=Bethesda_Tutorial_Dialogue |
| | |Next=Bethesda_Tutorial_Basic_Quest_Scripting |
| | }} |
|
| |
|
| =Résumé= | | =Résumé= |
| Ce chapitre va vous montrer comment créer des dialogues spécifiques a notre quête, "Le Dernier Espoir de Bendu Olo". | | Ce tutoriel va vous permettre de créer l'amulette qui fut volée a Bendu Olo dans notre quête. |
| | | <br><br>Vous apprendrez: |
| | | * Comment créer un nouvel objet. |
| Vous allez apprendre: | | * Comment l'ajouter a l'inventaire d'un acteur. |
| * Comment un dialogue pour Skyrim est crée dans le Creation Kit. | |
| * Comment scripter des événements suivant les choix de dialogue du joueur. | |
| | |
| =Les Vues de Dialogues=
| |
| | |
| Skyrim offre un système d'agencement graphique afin de vous aider a voir le cheminement de votre dialogue pendant que vous le créez.
| |
| | |
| | |
| ::{|style="border-collapse: separate; border-spacing: 0; border-width: 1px; border-style: solid; border-color: #000; padding: 0"
| |
| |-
| |
| |style="border-style: solid; border-width: 0"|[[Image:CKNewFeature.jpg|48px]]
| |
| |style="border-style: solid; border-width: 0"|Si vous êtes habitués a l'ancien système de dialogues de Fallout 3 et avant, il est toujours disponible sous l'onglet Player Dialogue (et, en fait, la visualisation est juste une jolie interface pour ce système).
| |
| |}
| |
| | |
| Pour commencer avec les vues, naviguez a votre quête (GSQ01) et double-cliquez dessus pour ouvrir la fenêtre de quête. Puis ouvrez l'onglet Dialogue Views. Votre fenêtre devrais ressembler a ça:
| |
| | |
| [[Image:EmptyDialogueTab.png|600px]]
| |
| | |
| Pour faire une nouvelle vues, faites un clic droit dans le tableau a gauche de la fenêtre et sélectionnez "New". On va vous demander de donner un ID pour cette vue, et l'ID de la quête sera déjà placé pour servir de préfixe. Appelez cette vue "GSQ01BenduView". Cliquez dessus dans le tableau pour la sélectionner.
| |
| | |
| Nous n'avons rien ajoutés à la vue pour le moment, donc nous n'avons qu'un vide blanc. Faites un clic droit dedans, et sélectionnez "Create Branch". Vous allez devoir entrer un nom pour la branche, vous devriez l'appeler "GSQ01MeetingBenduBranch". Une fenêtre de plus pour nommer un topic (vous pouvez juste accepter le défaut "GSQ01MeetingBenduBranchTopic"), et, en appuyant sur Entrée, vous verrez une série de rectangles qui m'ont probablement aucun sens pour vous.
| |
| | |
| [[Image:DialogueStartingBranch.png]]
| |
| | |
| Ainsi, tout a l'heure nous avons créé une branche, qui a automatiquement créée un Topic pour elle même. Ce Topic ne contient pour le moment aucune Info.
| |
| | |
| [[Image:DialogueStartingBranchLabeled.png|600px]]
| |
| | |
| =Topics=
| |
| | |
| Double-cliquez sur le Topic pour ouvrir son éditeur.
| |
|
| |
|
| [[Image:EmptyTopicWindow.png|450px]]
| | =Créer/Copier un Objet= |
| | | Lorsque vous modderez, vous copierez la plupart du temps un objet déjà existant et changerez ses valeurs. De cette manière, vous aurez déjà le modèle 3D près, et vous vous baserez sur quelque chose que vous savez qu'il marche, vous n'aurez alors pas a régler toute les options. |
| La seule chose qui nous intéresse ici est le champ "Topic Text". C'est celui qui défini la commande que le joueur choisiras dans la liste des options de dialogue den parlant a un PNJ. Nous allons faire du joueur un aventurier serviable, mettez donc "Est-ce que vous avez besoins d'aide pour quelque chose?"
| |
| | |
| Double-cliquez dans la table des Info, afin de pouvoir entrer la réponse du PNJ.
| |
| | |
| [[Image:EmptyResponseWindow.png|300px]]
| |
| | |
| Dans le champ "Response Text", entrez: "Oui, maintenant que vous le dites. Une saleté de voleur m'a pris mon amulette. Est-ce que vous voulez bien me la... ahem... ramener?"
| |
| | |
| Maintenant, appuyez sur le bouton "OK" en bas de la fenêtre '''deux fois'''. La fenêtre va disparaitre et vous verrez la fenêtre "Topic Info".
| |
|
| |
|
| ::{|style="border-collapse: separate; border-spacing: 0; border-width: 1px; border-style: solid; border-color: #000; padding: 0" | | ::{|style="border-collapse: separate; border-spacing: 0; border-width: 1px; border-style: solid; border-color: #000; padding: 0" |
| |- | | |- |
| |style="border-style: solid; border-width: 0"|[[Image:CKInDepth.jpg|48px]] | | |style="border-style: solid; border-width: 0"|[[Image:CKInDepth.jpg|48px]] |
| |style="border-style: solid; border-width: 0"|La première fois que vous avez appuyé sur le bouton "OK", l’éditeur fait un correction orthographique simple. Si vous avec bien copié le texte, il ne devrais pas y avoir d'erreur, donc le premier clic sur le bouton n'a rien fait<br>(N.D.T. Il se peut que le correcteur ne gère pas le Français, dans ce cas, appuyez sur Ignore ou Ignore All) | | |style="border-style: solid; border-width: 0"|Même ici, nous copions souvent un objet existant pour pouvoir travailler avnt d'avoir les graphismes. Beaucoup d'objets du jeu on commencé en ressemblant a des sceau. |
| |} | | |} |
|
| |
|
| =Topic Infos=
| | Pour cette amulette, nous allons faire une copie de l'Amulette du Conseil des Anciens qui est utilisée dans la quête de la Confrérie Noire. Dans la fenêtre d'objets, naviguez vers <code>Items -> Armor -> AmuletsandRings</code>. |
| [[Image:TopicInfoWindowStart.png|600px]]
| |
| | |
| Il y a plein de données dans cette fenêtre, mais la plupart nous est inutile. Ce qui nous intéresse est le tableau Conditions au milieu. C"est ici que nous spécifions au jeu qui est capable de dire cette Info. Si nous nous contentons de cliquer sur "OK" ici et que nous laissions la condition vide, tous les PNJ du monde aurons un Topic disant "Est-ce que vous avez besoins d'aide pour quelque chose?"
| |
| | |
| Faites un clic droit dans la liste de Conditions et sélectionnez "New" pour faire notre première condition pour cette Info.
| |
| | |
| [[Image:ConditionItem.png]]
| |
|
| |
|
| Chaque Condition est une vérification qui est sois Vrais, sois Faux. Si toute les conditions de la liste sont valides, alors l'Info sera valide. Notre première condition est juste qui est capable de dire cette ligne. "GetIsID" est sélectionnée par défaut, car elle est très souvent utilisée dans les conditions de dialogues. Cliquez sur le bouton au milieu qui pour le moment dit "INVALID" afin de choisir l'acteur approprié. Sélectionnez "GSQBenduOlo" dans le menu déroulant puis appuyez sur "OK".
| | [[Image:CKObjectWindowAmuletsAndRings.png|600px]] |
|
| |
|
| [[Image:ConditionItemFilled.png]]
| | Double cliquez sur "ElderConcilAmulet" pour ouvrir la fenêtre des armures. |
|
| |
|
| Hit OK on the condition window to close it out, and you should then see it in the list. Now only Bendu can say it, but we don't want him saying it all the time; just before he's given the quest to the player. So we're going to add one more condition. Right-click in the condition list and select "New" again.
| | [[Image:CKElderCouncilAmulet.png|600px]] |
|
| |
|
| We're going to further limit this bit of dialogue based on the quests current stage. So click on the Condition Function pull-down and select "GetStage." (You can type the first few letters to skip around in the list -- much faster than scrolling.) Now if you click the "INVALID" button to select parameters, it will bring up a list of quests rather than base objects (since it knows that the GetStage condition only deals with quests). Select "GSQ01" from the menu and hit OK.
| | Nous allons y faire quelque changement pour faire quelque chose d'approprié pour notre quête. |
| | * '''ID:''' Changez le en "GSQAmulet" |
| | * '''Name:''' Mettez "Amulette de Bendu Olo" |
| | * '''Valeur:''' Changez pour 250 (Bendu n'est pas très riche) |
|
| |
|
| Now all that's left is to tell the condition which quest stage we care about. Since we know the quest is starting at stage 0, we could select "==" for our comparison and set the value to "0," but that might break this condition if we ended up adding some stage before this one. The safer way to set the condition is to check that our current stage is lower than 10, so choose "<" from the Comparison list and put "10" in the value field.
| | Laissez le reste exactement tel qu'il est, et appuyez sur OK. Comme nous avons changé l'ID, on va nous demander si nous voulons créer un nouvel objet avec ces attributs, ou change celui existant. Nous voulons faire un nouvel objet, alors appuyez sur "Yes". |
|
| |
|
| [[Image:ConditionItemGetStage.png]] | | [[Image:CKNewForm.png]] |
|
| |
|
| ::{|style="border-collapse: separate; border-spacing: 0; border-width: 1px; border-style: solid; border-color: #000; padding: 0"
| | C'est tout ce qu'il faut! Dans ce cas, nous avons fait un morceau d'armure, mais la même méthode peut être utilisé pour tout objet du jeu qui a un ID, Vous pouvez faire de nouvelles armes, races, créatures, sorts, ingrédients, etc. en changeant l'ID. |
| |-
| |
| |style="border-style: solid; border-width: 0"|[[Image:InDepth.jpg|48px]]
| |
| |style="border-style: solid; border-width: 0"|Note that you can reorder conditions with the left and right arrow keys or the buttons at the bottom left of the condition window. In this example the order doesn't matter, but if you started setting up your conditions with ORs as well as ANDs, it would.
| |
| |}
| |
|
| |
|
| Our final topic info window should look like this:
| | La dernière chose a faire est de la mettre dans l'inventaire de notre voleur. Ouvrez l'acteur GSQThief a nouveau, et naviguez a l'onglet inventaire de la fenêtre d'acteur. |
|
| |
|
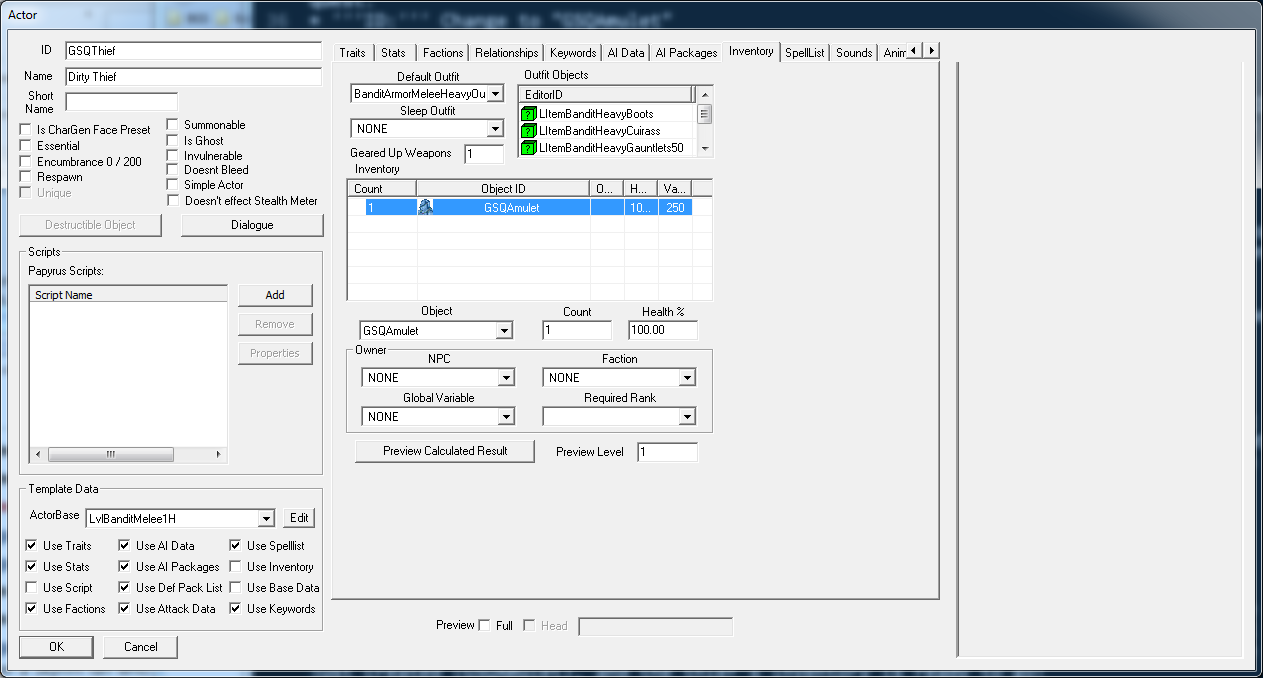
| [[Image:TopicInfoWindowFilled.png|600px]] | | [[Image:CKThiefInventoryBlocked.png|600px]] |
|
| |
|
| Hit OK to close the Topic Info window, then OK again in the Topic window to close it.
| | La première chose que vous remarquerez est que il est entièrement grisé. C'est parce que nous utilisons un template pour cet acteur, et donc l'inventaire est pris de ce template. Mais nous pouvons passer outre certaines parties de ce template facilement. Décochez la case "Use Inventory" en bas a gauche de la fenêtre, et la zone de l'inventaire devrais s'activer. |
|
| |
|
| =Linking Dialogue=
| | Nous allons devoir utiliser une tenue pour notre bandit, puisque nous n'utilisons plus le template. Sélectionnez "BanditArmorMeleeHeavyOutfit" dans le menu "Default Outfit". |
| Finally, we're back at the Dialogue View! With our new bit of dialogue present. If you want to actually see all the text (and why wouldn't you?), click the "Show All Text" checkbox at the bottom of the view.
| |
|
| |
|
| [[Image:DialogueViewWithStuff.png]]
| | Pour ajouter des objets en plus dans l'inventaire de notre acteur, faites un clic droit dans le tableau de l'inventaire et sélectionnez "New". Cela ajoute une nouvelle entrée dans le tableau qui par défaut est 1 instance du premier objet du jeu. Dans le menu déroulant Object, sélectionnez l'objet que nous venos de créer (GSQAmulet), et l'inventaire du voleur est près! |
|
| |
|
| Since Bendu is posing a question with his line, we want to give the player a chance to answer. Right-click in the branch area and select "Add Topic." (If you don't see that in the contextual menu, you probably did not click in the branch.)
| | The first thing you'll notice is that it's all grayed out. That's because we're basing this actor off of a template, and so the inventory is already set by that template. But we can override individual parts of a template easily. Uncheck the "Use Inventory" box in the bottom left corner of the window, and the inventory area should light up. |
|
| |
|
| This will open up another topic window. You'll have to assign an ID to this one; "GSQ01MeetingBenduYes" works, since this will be our choice where the player agrees to help. Put "Sure, I can do that." as the topic text, and double click in the info table to make a response. For the text, enter "Oh, thank you so much. It's been taken to Reachwind Eyrie. Please hurry! I'll give you twice what it's worth!" This time when you hit OK the spell-check will complain about "Reachwind." Just hit the Ignore button to dismiss it, hit OK one more time, and you're back to the Topic Info window.
| | We'll have to fill in an outfit for our bandit, since the default template one is now gone. Select "BanditArmorMeleeHeavyOutfit" from the Default Outfit pulldown menu. |
|
| |
|
| Now that you're here, double click on the response text again to bring it back up. Notice the list of sound files at the bottom of this window.
| | To put additional items into the actor's inventory, right-click in the Inventory table and select "New." This adds an entry to the table that defaults to 1 instance of the first object (alphabetically) in the game. From the Object pulldown menu, choose the item we just created (GSQAmulet), and the thief's inventory is ready to go! |
|
| |
|
| [[Image:BadSoundExport.png|300px]] | | [[Image:CKInventoryFilled.png|600px]] |
| | |
| Since we haven't put any conditions on this dialogue, the game still thinks everyone in the world can say it, and will try to make appropriate sound files for every voice type. This is a big waste of disk space and (if you're planning to record voice) a waste of time recording unnecessary performances. So close this window and add a GetIsID condition looking for GSQBenduOlo (like we did in the previous topic info). Now if you look at the response again, you'll see that it knows that this line is only said by a MaleDarkElf voicetype, and so only lists the one file.
| |
| | |
| [[Image:GoodSoundExport.png|300px]]
| |
| | |
| Now hit OK on the Topic Info window and the Topic window until you're back looking at the dialogue view again. You'll have a new topic floating in your branch, which has expanded to accommodate it.
| |
| | |
| [[Image:MultiTopicBranch.png|450px]]
| |
| | |
| Now the beauty of Dialogue Views is that we can arrange these topics however makes sense for us. At runtime, the game doesn't care all about this positioning; it's purely for the designer's convenience. So grab the new topic by its top bar and drag it to a convenient spot.
| |
| | |
| Make one more topic, this time with a Topic Text of "Sorry, not right now." Set Bendu's response to be "Well, fine then." Don't forget to put a GetIsID condition on the Topic Info. Once you've created those two, the Dialogue View should look something like this.
| |
| | |
| [[Image:UnconnectedDialogue.png|450px]]
| |
| | |
| All these topics exist within the branch, but the game doesn't know anything about the flow between them. We have to link them together. Click on GSQ01MeetingBenduBranchTopic to make it active. Then click once more on the text of the line (you'll see the cursor turn into a little hand when you roll over it) and drag a line to the GSQ01MeetingBenduYes. Do the same thing, dragging a line from the initial topic to the GSQ01MeetingBenduNo topic.
| |
| | |
| [[Image:ConnectedDialogue.png|450px]]
| |
| | |
| Now, when the player selects the prompt "Do you need help with anything?", Bendu will say his line and then present the player with another list of choices based on the links from that topic. The choices will be listed in the order they were linked from that topic.
| |
| | |
| =Scripting Dialogue=
| |
| We're going to make our first foray into the scripting system here, but it will be very straightforward, so don't worry if that's not your cup of tea.
| |
| | |
| Right now we have a dialogue flow set up, but the game has no notion of what the various choices mean. When the player says, "Yes," we have to tell it that the player has accepted the quest and we're now at the next stage.
| |
| | |
| Double-click on the text "Oh, thank you..." under the GSQ01MeetingBenduYes topic. (Note that this brings us directly to the Info window without first bringing up the Topic window.)
| |
| | |
| At the bottom of this window, you see fields for Scripts marked "Begin" and "End." The Begin script runs when the NPC starts saying the line, and the End script will run when he finishes. (In scripting terminology, these little pieces of script are called "script fragments" - see [[Topic_Info_Fragments|Topic Info Fragments]] for more details.)
| |
| | |
| In the End field, enter this script command: <code>GetOwningQuest().SetStage(10)</code>
| |
| | |
| The <code>SetStage(10)</code> portion, as you might expect, sets a quest's current stage to 10. The <code>GetOwningQuest()</code> part just says that the quest we care about is the one that contains this dialogue. (Sometimes you might want a line in your quest to muck around in a different quest, so we have to be specific.)
| |
| | |
| If you press "Compile" you'll see some gobbledygook pop up under "Script Name" to the right. You can ignore that. (If you typed something wrong, though, the Editor will complain at you.)
| |
| | |
| When you're ready to close the window, it should look like this:
| |
| | |
| [[Image:ScriptedDialogue.png|600px]]
| |
| | |
| And that's it! Close the window, and you're good to go. You'll note that in the dialogue view, this info's text now has "[S]" at the front of it, so we can easily spot which bits of dialogue have game logic attached to them without having to open each one.
| |
| | |
| =Branches and Conditions=
| |
| What we've just done is craft a Branch of dialogue. By default it's a "Top-Level" branch (which is why it's colored orange in the view). You don't need to worry about the other branch types right now; just know that a top-level branch is available as one of the first things an actor is able to say to the player.
| |
| | |
| The topic that has a yellow-orange bar at the top of it has been flagged as the branch's Starting Topic. When an actor is determining what choices to offer the player, it looks for starting topics and displays the prompts for all of them which are valid. If you remember, we put a condition on our starting topic that the quest stage had to be less than 10. Once the player chooses to accept the quest, we set the quest stage to 10, which means that starting topic is no longer valid; it won't appear in the actor's topic list anymore.
| |
| | |
| Non-starting topics can have much smaller lists of conditions, since they are typically only accessed if the starting topic for their branch is valid. That's why we just limited them to a specific NPC so we wouldn't have extra voice files. From a gameplay perspective, it wouldn't have mattered.
| |
| | |
| Once the player chooses a topic with no links out of it, the game will again look for valid top-level topics to give the player choices. If none are valid, the NPC will release the player from dialogue.
| |
| | |
| =Try It Out=
| |
| Load the game with your plugin and go meet Bendu. (Remember, you can hop right there with <code>COC MixwaterMillWorkersHouse</code>.) He should now have something to say to you.
| |
| | |
| [[Image:DialogueInGame.png|500px]]
| |
| | |
| There are a few problems with the dialogue as it currently stands:
| |
| # It flashes directly to the next choice list. (Since there's no audio, if you don't have captions on, you won't have any idea what he said. Even if you do, they probably flashed by so quickly you couldn't read.)
| |
| # If you refuse to help, he'll just go right back to the same top level topic, which feels odd.
| |
| | |
| Luckily these are easily addressed.
| |
| | |
| =Recording a Temp Track=
| |
| Open up the GSQ01MeetingBenduBranchTopic and navigate through to its Response window. At the bottom of the window, you'll see a "Record" button. Press this button and, if you have a microphone hooked up to your computer, you can record a performance of the line yourself. If you don't (or you're self-conscious and don't like the sound of your own voice) you can just record a few seconds of silence, enough to give the captions time to be read. Hit the Save button to commit this file to disk.
| |
| | |
| Do the same thing for the other two topics we made. (While you're in there, consider setting the emotions for those lines, so that Bendu will show Disgust or Happiness depending on your choice.)
| |
| | |
| In the "No" topic, click the box that says "Goodbye." This will drop the player out of dialogue when it's selected, so you won't end up back at the topic list after the line is done. (You should also make the "Yes" topic a goodbye. Since Bendu only has one top-level topic right now, that's not necessary, because we know he'll have nothing else to say when he's done here. But if another quest had dialogue for him, it might be confusing to the player.)
| |
| | |
| =Additional Dialogue=
| |
| While we're here, let's also make the dialogue that will close out the quest when we come back with the amulet.
| |
| | |
| In the dialogue view, right-click to create a new branch, and call it "GSQ01BenduFinishBranch." Accept the default name for the starting topic, and make the topic text, "I've brought your amulet." Give him something good as a response (I went with "I hope you gave that thief a good thrashing!"). It will want two conditions; one that restricts it to Bendu, and another that limits it to stage 30 of the quest. Finally, set it to be a Goodbye, and set the quest to stage 40 when it's said.
| |
| | |
| You should be able to do all this by now. It will look like this when you're done.
| |
| | |
| [[Image:FinishingQuestDialogue.png|600px]]
| |
| | |
| We still haven't dealt with the amulet itself yet, and the quest has no way to proceed from stage 10 to 30, so we have work to do!
| |
| | |
| ::{|style="border-collapse: separate; border-spacing: 0; border-width: 1px; border-style: solid; border-color: #000; padding: 0"
| |
| |-
| |
| |style="border-style: solid; border-width: 0"|[[Image:InDepth.jpg|48px]]
| |
| |style="border-style: solid; border-width: 0"|This might seem like a lot of work and unnecessary data-fumbling to just get characters to say a few lines. Part of the complexity is historical -- because it evolved from the old Morrowind text-based dialogue system, the organization can seem a little sideways and non-directed. But the same system also handles multiple characters saying the same line, combat barks, player greetings, hit responses, etc. Flexibility sometimes means complexity.
| |
| | |
| With some practice, all of this becomes second nature, and you'll be able to mechanically work the dialogue system as fast as you can write the lines themselves.
| |
| |}
| |
|
| |
|
|
| |
|
| {{Template:Tutorial_Bottom_Bar | | {{Template:Tutorial_Bottom_Bar |
| |Prev=Bethesda_Tutorial_Creating_an_Actor | | |Prev=Bethesda_Tutorial_Dialogue |
| |Next=Bethesda_Tutorial_Creating_an_Item | | |Next=Bethesda_Tutorial_Basic_Quest_Scripting |
| }} | | }} |
Sandbox de Jupotter, utilisé pour faire des traductions
Modèle:Tutorial Index
Résumé
Ce tutoriel va vous permettre de créer l'amulette qui fut volée a Bendu Olo dans notre quête.
Vous apprendrez:
- Comment créer un nouvel objet.
- Comment l'ajouter a l'inventaire d'un acteur.
Créer/Copier un Objet
Lorsque vous modderez, vous copierez la plupart du temps un objet déjà existant et changerez ses valeurs. De cette manière, vous aurez déjà le modèle 3D près, et vous vous baserez sur quelque chose que vous savez qu'il marche, vous n'aurez alors pas a régler toute les options.

|
Même ici, nous copions souvent un objet existant pour pouvoir travailler avnt d'avoir les graphismes. Beaucoup d'objets du jeu on commencé en ressemblant a des sceau.
|
Pour cette amulette, nous allons faire une copie de l'Amulette du Conseil des Anciens qui est utilisée dans la quête de la Confrérie Noire. Dans la fenêtre d'objets, naviguez vers Items -> Armor -> AmuletsandRings.
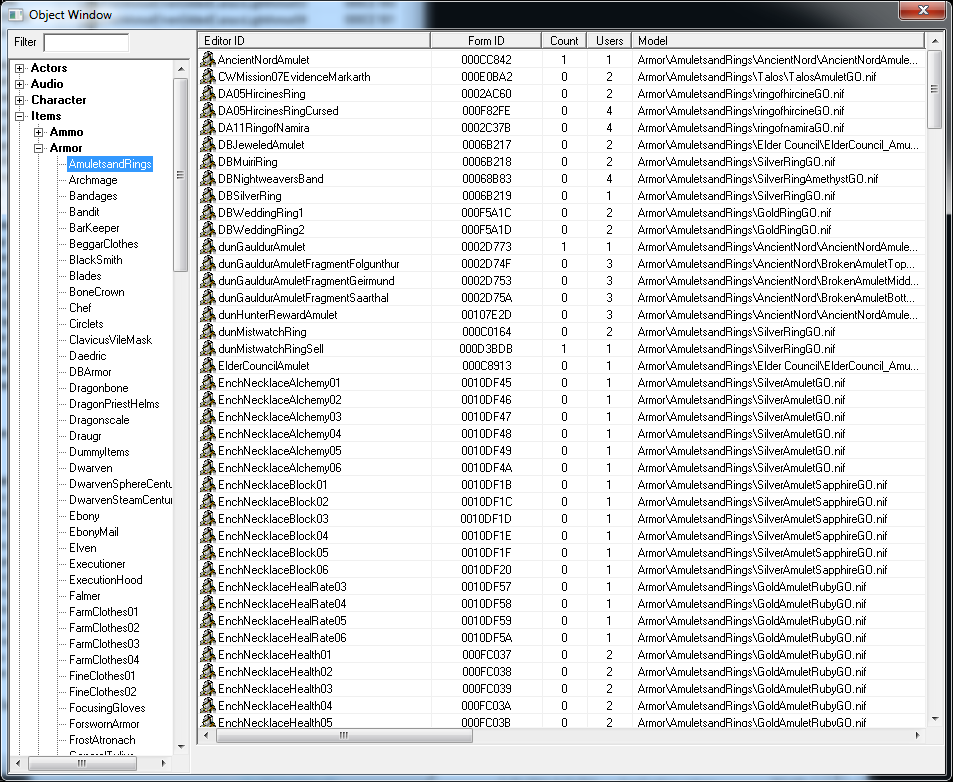
Double cliquez sur "ElderConcilAmulet" pour ouvrir la fenêtre des armures.
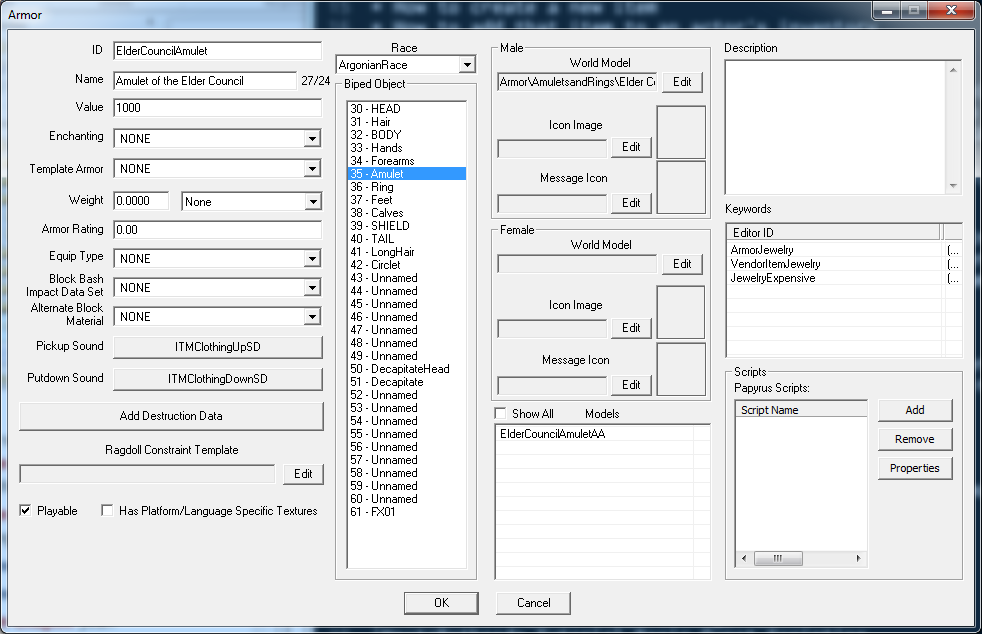
Nous allons y faire quelque changement pour faire quelque chose d'approprié pour notre quête.
- ID: Changez le en "GSQAmulet"
- Name: Mettez "Amulette de Bendu Olo"
- Valeur: Changez pour 250 (Bendu n'est pas très riche)
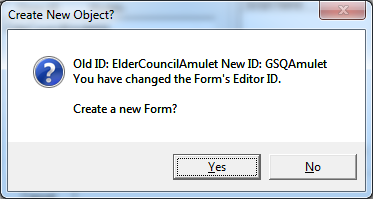
Laissez le reste exactement tel qu'il est, et appuyez sur OK. Comme nous avons changé l'ID, on va nous demander si nous voulons créer un nouvel objet avec ces attributs, ou change celui existant. Nous voulons faire un nouvel objet, alors appuyez sur "Yes".
C'est tout ce qu'il faut! Dans ce cas, nous avons fait un morceau d'armure, mais la même méthode peut être utilisé pour tout objet du jeu qui a un ID, Vous pouvez faire de nouvelles armes, races, créatures, sorts, ingrédients, etc. en changeant l'ID.
La dernière chose a faire est de la mettre dans l'inventaire de notre voleur. Ouvrez l'acteur GSQThief a nouveau, et naviguez a l'onglet inventaire de la fenêtre d'acteur.
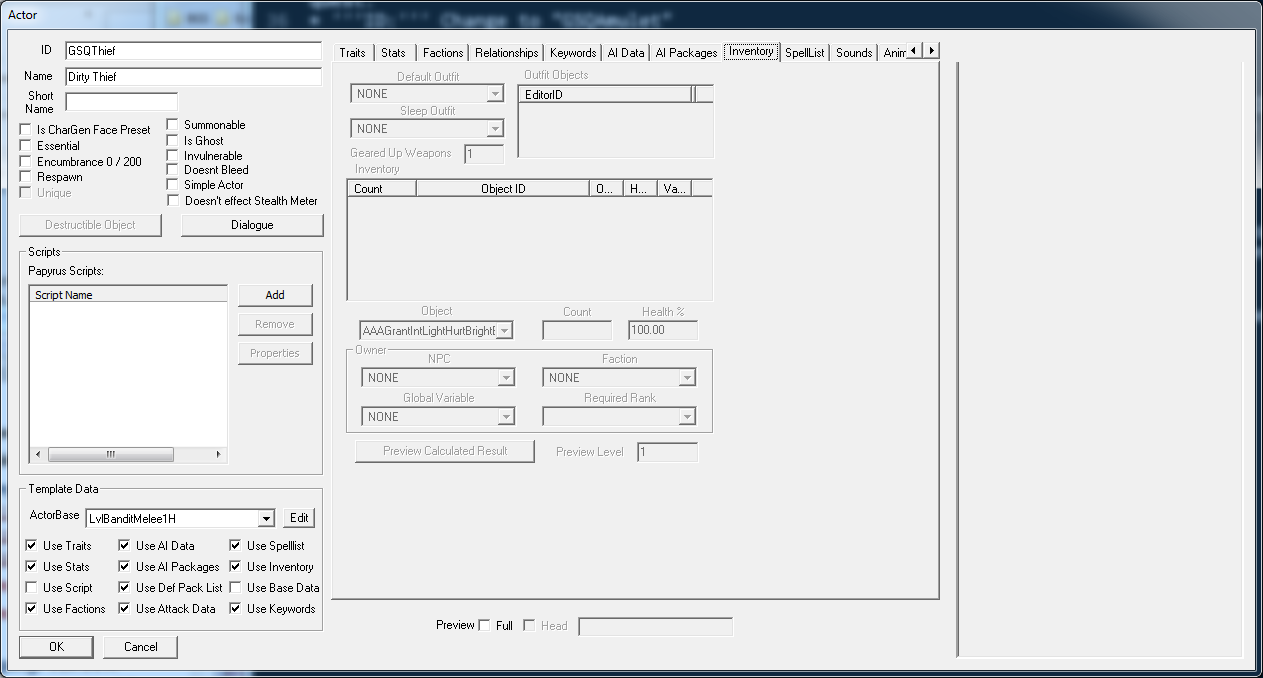
La première chose que vous remarquerez est que il est entièrement grisé. C'est parce que nous utilisons un template pour cet acteur, et donc l'inventaire est pris de ce template. Mais nous pouvons passer outre certaines parties de ce template facilement. Décochez la case "Use Inventory" en bas a gauche de la fenêtre, et la zone de l'inventaire devrais s'activer.
Nous allons devoir utiliser une tenue pour notre bandit, puisque nous n'utilisons plus le template. Sélectionnez "BanditArmorMeleeHeavyOutfit" dans le menu "Default Outfit".
Pour ajouter des objets en plus dans l'inventaire de notre acteur, faites un clic droit dans le tableau de l'inventaire et sélectionnez "New". Cela ajoute une nouvelle entrée dans le tableau qui par défaut est 1 instance du premier objet du jeu. Dans le menu déroulant Object, sélectionnez l'objet que nous venos de créer (GSQAmulet), et l'inventaire du voleur est près!
The first thing you'll notice is that it's all grayed out. That's because we're basing this actor off of a template, and so the inventory is already set by that template. But we can override individual parts of a template easily. Uncheck the "Use Inventory" box in the bottom left corner of the window, and the inventory area should light up.
We'll have to fill in an outfit for our bandit, since the default template one is now gone. Select "BanditArmorMeleeHeavyOutfit" from the Default Outfit pulldown menu.
To put additional items into the actor's inventory, right-click in the Inventory table and select "New." This adds an entry to the table that defaults to 1 instance of the first object (alphabetically) in the game. From the Object pulldown menu, choose the item we just created (GSQAmulet), and the thief's inventory is ready to go!
Modèle:Tutorial Bottom Bar


